By Andrew Weiman, Managing Partner Engineering and Commercialization, Bresslergroup
Three key steps will ensure components are properly sealed against liquids.
Engineering products for use in harsh environments is both an art and a science. Though conceptually simple, the challenges of sealing tend to surprise and frustrate those without experience and continually challenge even experienced designers. Over the past 40 years, the engineers and industrial designers at Bresslergroup have developed expertise for protecting batteries, motors, and other high value electromechanical components. Functionality that is critical to usability and performance, such as internal audible alarms, moving buttons, allowing condensing humidity to escape the enclosure, product submersion, and so on, has been maintained.
While experience counts for a lot when confronting new design challenges there are some basic design tenants one can subscribe to. Let’s start with some basic terminology and questions:
Waterproof – is a surprisingly ambiguous term! Water resistant, water repellant, sealed, submersible, waterproof, watertight – what does it all mean? Sadly, in most cases these are marketing terms. And companies tend to use them liberally so always approach such claims with a bit of skepticism. Even products that claim specific IP ratings (which are not ambiguous) often fall woefully short of their marketing claims. This reality highlights the challenges of waterproofing in the real world. It also begs the question; do you really need to hit the performance requirements to be competitive? If the answer is yes, your design team should be prepared to tackle a decent level of complexity in terms of design as well as testing. Effective sealing for high IP ratings has the potential to add product size and cost so it’s always best to know “how sealed is sealed” for you.
When in doubt keep it simple!
Once you’ve determined that you need to seal to a high performance standard the best policy is to keep it simple. Particularly if you are relatively new to sealing, simplicity is the golden rule. Simple geometry, simple parting lines, and simple part interfaces and stack ups are all invaluable. How many times have you heard either “well this should have worked [but it doesn’t],” or “it worked on the two prototypes we made [but not now]?” Producing reliable seals in the context of real world manufacturing constraints is inevitably going to be a challenge. Use your creativity and focus on simplifying the mechanical elements into a robust configuration.
Here’s a short list of items to consider in simplifying your design:
1. Start with circles – The easiest opening shape to seal is a circle because you can use standard o-rings and robust radial type seals, which provide uniform sealing force around the circumference.
2. When possible, avoid sealing between three (or more) part interfaces – three way seals can be achieved but ensuring proper gasket compression between three (or more) parts within standard part tolerances tends to be a manufacturing challenge.
3. Proper gasket glands are important – stand-alone gaskets need to be well supported on all sides. Gaskets “squirting” out of the pinch zone is a common source of seal failure.
4. Tolerances matter – The stiffer the parts, the easier to seal. For example, plastic enclosure deflection under the load of a gasket cannot be ignored. Likewise gasket compression percentage is something that needs to stay within a reasonable range.
Tolerances matter – The stiffer the parts, the easier to seal. For example, plastic enclosure deflection under the load of a gasket cannot be ignored. Likewise gasket compression percentage is something that needs to stay within a reasonable range.
5. Interestingly, it’s usually a bad idea to completely seal something. There needs to be a way for air to vent in and out of the case, usually through hydrophobic membrane vents. These keep the device from exploding due to changes in air pressure and give water vapor that has gotten inside the case (and it will get in) a way to get out (rather than condensing on your components).
Of course not everything can be simple…
Inevitably every project is forced to violate the goal of simplicity in some form or another. This is where experience really matters – particularly understanding what other types of processes are possible/applicable and what their actual limitations are. There are many options besides an o-ring or simple gasket to seal an enclosure including:
1. Insert molding and elastomeric over molding
2. Hot plate welding
3. Ultrasonic welding
4. Liquid adhesive
5. Tape
6. Encapsulating or potting the sensitive components versus enclosing
7. Design to shed water (if not submerged)
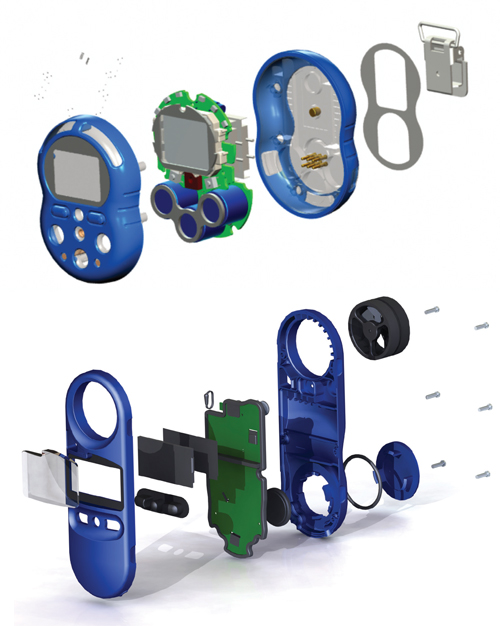
One interesting project we worked on recently was the Scott Protégé. Protégé is a handheld toxic and combustible gas monitor which needed to be both sealed to IP 67 requirements and intrinsically safe. Basic o-ring design wasn’t in the cards. Through the use of creative problem solving and advanced manufacturing techniques we produced a robust sealed enclosure that was also easy to assemble. First the casework itself was a two shot molding. The first shot was clear and served as both the structural case-work for the product as well as the lens for an LCD and for discrete warning lights. The second shot was an opaque elastomeric over mold. This also served multiple functions. First it was a mask to the clear first shot, second it provided protection in a drop, third it wrapped around the clear part and formed a continuous gasket, and finally elastomeric buttons were formed with the over mold and used to actuate switches located internally on a PCB.
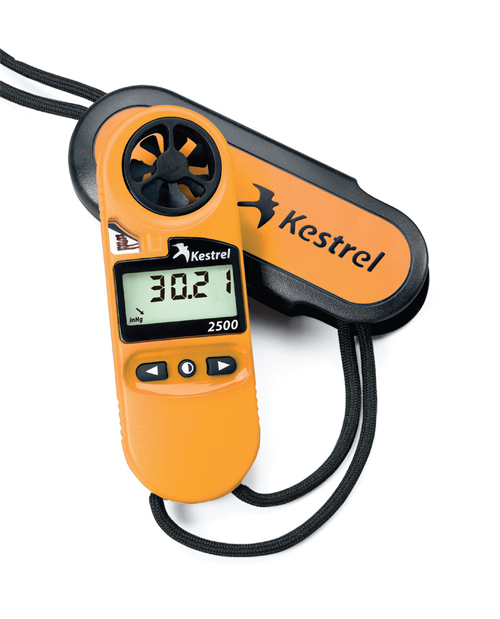
When examining your sealing options for your design, keep it simple. The easiest opening shape to seal is a circle because you can use standard o-rings and robust radial type seals, which provide uniform sealing force around the circumference.
In addition there were other interesting challenges to this design. One was the requirement for the unit to provide power to a modular attachment. The answer was to insert-mold contact pins directly into the main housing. These pins were sized to plug into sockets on the board internally and externally provided an electrical contact pad for the module to mate with.
Another challenge was producing enough acoustic signal from the warning alarm within the casework using the power budget and space available. In this case the use of acoustically transmissive membranes provided a path out for sound but no path in for water. A corollary to this technique was also used for the inbound pathway for air to reach the gas sensors – again hydrophobic membranes were used to protect the case from water while allowing air to diffuse into and out of the case.
Even though the solution was not simple, we still leveraged our understanding of fundamental sealing principals and used advanced manufacturing methods to deliver a robust unit that’s simple to assemble. The basic assembly method ended up as a top and bottom case, which held a PCB, display and battery – simple conceptually. Gone was the need to seal discrete lenses, and buttons and gone was the need to carefully constrain and pinch a squirrely gasket.
Ultimately, each design challenge is different and will require unique solutions, but there are many techniques to consider and combine. And in our experience, when looking for new solutions, it’s best to be a little skeptical and ask a lot of questions.
Bresslergroup
www.bresslergroup.com


Good article, but another item should be added between items 4 and 5 in the short list of considerations: “SURFACE FINISHES-…..”. This would be especially important where mold parting lines may cross seal surfaces, for example. This subject is covered in the Parker O-Ring handbook in sections for static and dynamic seals.
Thanks for the positive feedback – and for adding a good point. Surface finish is something we typically specify, and as you point out, its best to avoid crossing additional parting or witness lines. A short term fix to this can be an o-ring lubricant, but often this is not a good long term or cost effective manufacturing solution.
Very interesting and useful for the Industrial IOT project I am working on presently. Thank you.
I have a situation where I want to seal a hole but the problem is there is a boss that moves up/down through that hole what kind of sealing can I use