Written by Robert Carlisle, President
Concrete Fastening Systems

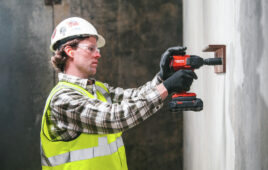
Choosing the ideal concrete fasteners for securing outdoor controls is essential for reliability and longevity of an installation — such as with a remote-monitoring system with solar panel as shown here.
Fastening to heavy, solid materials such as concrete or brick might seem like a challenging task but it’s possible to do so well with the correct preparation. First, it’s essential to establish the correct information about an application to ensure use of the most effective concrete anchors.
This means an assessment of the material and weight of the product to be fastened and the environment it will be in. It is also important to…
Here are questions to help with these considerations.
1. What is the base material of the product to be fastened?
Let’s consider attaching a sign to a solid object as an example. In this case, there are three types of base material to choose from — concrete, brick, or block — and each one has different guidelines to follow for a secure attachment.
- If concrete is used, it’s important to avoid setting the fasteners too close together. Typically, these components must be installed about 10 times their diameter apart from one another. Also, avoid placing the anchors within about five times their diameter from any unsupported edges.
- If attaching a sign to brick or block, the fastener can be placed in the mortar joint or directly in the brick or block. The holding values are determined by the quantity and the quality of the mortar if attached in the joint. However, if the concrete fasteners are placed in the brick or block, the holding values are determined by the quality of the base material and whether the anchor is in the hollow or solid section.
2. How heavy is the product?
There is a correlation between the improved holding values of an anchor with the size of its diameter. Generally, the larger the diameter of the anchor and the deeper the depth of the embedment, then the higher the holding value.
3. What is the diameter of the hole?
In the example, it’s essential to determine the diameter of the hole in the sign for the correct placement of the fastener. It’s also necessary to ensure that the diameter of the anchor chosen for this application will fit through the hole in the sign.
Concrete anchors require a slightly larger hole in the sign than the designated diameter of the anchor. For example, a 1/4-inch concrete anchor requires a 5/16-inch hole in the fixture.
4. What environment will the product be left in?
Safety and reliability are critical for most applications. This means using fasteners that are durable and non-corrosive. Fasteners that are subject to harsh conditions, such as wet or moist environments, can eventually rust or corrode.
Here are some comparisons to consider before making a choice.

5. What types of concrete fasteners are available?
This question is best asked after answering the previous ones as they will help narrow down the ideal choices.
Here are a few options:

Wedge anchor
The wedge anchor: should only be used in solid concrete and never in brick or block. These anchors are offered in several diameters, including from 1/4 to 1-1/4-inch and lengths ranging from 1-3/4 to 12-inch.
Wedge anchors are available in zinc plated, hot-dipped galvanized, and stainless steel. These components typically come complete with nut and washer, and provide excellent holding values in concrete.
The wedge anchor installation process requires five simple steps:
- Drill a hole in the base material, a minimum of 1/2-inch deeper than the wedge anchor’s embedment. Use a carbide bitand hammer drill.
- Clean out the hole using compressed air and/or a wire brush.
- Place the nut on the end of the anchor before hammering into the hole to protect the threads during installation.
- Hammer the anchor through the hole in the sign and into the hole drilled in the base material. Make sure this is deep enough so a portion of the thread is below the surface of the sign.
- Tighten the nut three or four revolutions to set the wedge anchor. Torque values are typically found on the manufacturer’s manual or technical information page.
Sleeve anchors: versatile fasteners that can be used in concrete, brick, and block. These anchors are available in diameters of 1/4 to 3/4 inches and lengths of 5/8 to 6-1/4 inches. Several diameters are available in zinc-plated and stainless steel.

Sleeve anchor
There are also several head styles for the sleeve anchors including flat countersunk, round head, and hex nut. The hex nut has the most options in length and diameter. The flat countersunk and round head are only available in 1/4 and 3/8-inch diameters only.
These anchors typically come complete with nut and washer, and their length is measured from underneath the nut and washer.
The sleeve anchor installation process is relatively simple:
- Drill a hole in the base material, a minimum of 1/2-inch deeper than the sleeve anchor will be embedded. Remember: the anchor size is the hole size. Use the correct carbide bit and hammer drill.
- Clean out the hole of all debris.
- Hammer the sleeve anchor through the sign’s hole and into the hole drilled in the base material until the washer is snug with the sign.
- Finger tighten the nut and use a wrench to turn the nut several times until it is tight. Avoid over-tightening or the anchor may spin in the hole.

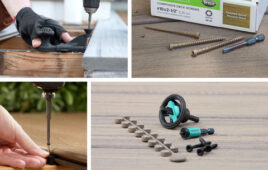
Tapcon 410 stainless-steel screw
Tapcons or concrete screws: versatile fasteners that can be used in concrete, brick, or block. They are available in blue Climaseal and 410 stainless steel.
The standard blue Tapcons come in two diameters: 3/16 and 1/4-inch. The larger-diameter Tapcon is available in 3/8, 1/2, 5/8, and 3/4 inches. These large diameter screws are only available in the hex washer head.
The length of the screw is determined by the thickness of the sign. The standard blue screws require a minimum embedment of one inch and a maximum embedment of 1-1/4-inch.
Installing Tapcons is easy:
- Choose the proper diameter carbide drill bit and drill a hole in the base material, a minimum of 1/2-inch deeper than the screw that will be embedment.
- Use a carbide bit and hammer drill. Remember: the hole size should be slightly smaller than the diameter of the screw being used.
- Clean out the hole with compressed air and/or a wire brush.
- Drive the screw through the hole in the sign using a drill or wrench until snug. If using a drill, avoid spinning the screw too quickly because it might over-torque or strip the threads.

As with any anchoring project, it is important to keep safety in mind and follow instructions carefully. Always remember to wear safety goggles, handle all tools with care, and follow technical specifications. Always refer to the manufacturer’s instructions or consult a contracting expert during an anchoring project.
~
Author: Bob Carlisle has been president of Concrete Fastening Systems, Inc. for 29 years, and has been involved in the concrete anchor business since 1981. By working on job sites and meeting with engineers and architects, Carlisle has gained a wealth of information in the field of fastening to concrete.


Tell Us What You Think!